Before QuickBooks came along, tracking jobs or projects for your business probably involved file folders and paper invoices and bank statements and lots of sticky notes. You hoped that you didn’t forget to bill a customer or record a payment. And calculating the profitability of a job was quite a challenge.
QuickBooks makes these tasks easy. You can attach multiple jobs to customers and assign expenses to them when you enter a purchase. You can also assign estimates and invoices to specific jobs, then do the same when payments come in. QuickBooks allows you to create individual records for each job based on all this data, and run reports that gauge profitability and unbilled costs, for example.
Transaction and reports templates are all ready for you to fill with your own data. If you haven’t yet created records for the products and services you sell to complete your jobs, you should do so before you start building your first one you’ll need to be able to add those sales to your records.
Creating Item Records
It’s always a good idea to make your item records as comprehensive as possible. But it’s especially important when you’re going to be creating and tracking jobs. We’ll create a service that might be used by a landscaping service as an example.
To get started, open the Lists menu and select Item List. Click the down arrow next to Item in the lower left so you can familiarize yourself with the options available there. Click New. In the window that opens, select Service from the drop-down list that opens below Type. Give your service an Item Name/Number and click the box if it will be a Subitem of another account.
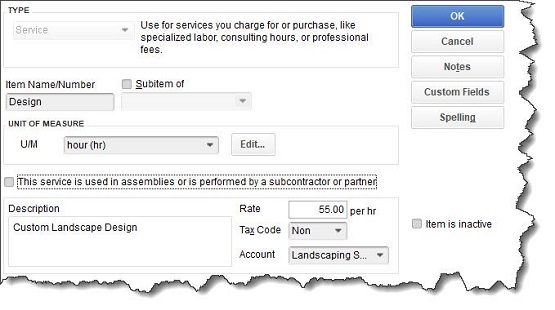
Figure 1: Before you can start building job records, you should create records for the products and services that will be used for them.
If you’re using a version of QuickBooks that says Enable under Units of Measure and you want to designate one, click the button and walk through the wizard to define it. If you’re using a version of QuickBooks that doesn’t offer it, don’t worry about it. Enter a brief Description in the appropriate field and then a Rate. Open the list in the Tax Code field and select either Tax or Non.
You may want to meet with someone in the office before you start creating items to go over the Tax Code and Account fields, or the question about assemblies or contractors – especially if you’re new to QuickBooks. They have to be correct, and you may have more questions if you have to create records for inventory parts, as this process is more complicated. If you’re sure of the information you entered here, though, click OK.
Creating Jobs
To start creating jobs, you need to open the Customers menu and click Customer Center. The Customers & Jobs tab on the left should be highlighted. Click the down arrow next to the field in the upper left and select New Customer & Job if you need to create a customer record first. If you already have a customer record, click once on the customer’s name in the list and then click Add Job. Either way, you’ll see a window like the one displayed below when you click the Job Info tab.
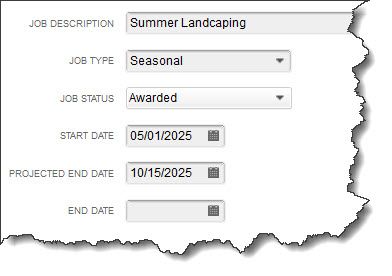
Figure 2: QuickBooks contains templates for each customer that you can use to create individual job records.
At the very top of this screen, above the window, you’ll see a field for Job Name, which you’ll need to enter. If this is a new customer, there won’t be an Opening Balance [dollar amount] As Of [Date]. If the customer owes you money from previous work, you’ll need to supply the balance owed, which you can find by looking in the Balance Total column back in the Customer Center’s customer list.
You’ll enter a Description, of course. If your company offers a variety of summer landscaping packages, you might want to be more specific (like Weekly and Monthly Summer Landscaping) so you can differentiate among them. You need to consider what kinds of Job Types you want to create. Click the down arrow in that field and select . Job Types provide a way for you to categorize different jobs.
Select your Job Status from the drop-down list, and then choose your Start Date and Projected End Date using the calendars provided. You’ll eventually be able to fill in the End Date field. When you’re done, click OK. Your new job will appear in the Customers & Jobs list, under the related customer.
Next month, the focus is will be on learning how jobs are used in QuickBooks. If you have questions before then, please don’t hesitate to contact the office for assistance. The goal, of course, is to learn new features that help you get the most you can out of the software.
Once you’re tracking Jobs in QuickBooks, you can run reports that automatically gauge their profitability. As always, if you have any questions, do not hesitate to ask.
![]()